Tableau Online tips: Site admins rejoice with ADFS authentication using SAML!
If you’re a site administrator, choosing the best authentication method for your organization requires you balance competing priorities. Never fear, SAML is here. Or more precisely, Active Directory Federation Services (ADFS) leveraging SAML is here.
Editor’s Note: Tableau Online is now Tableau Cloud.
This post is part of our series covering tips, tricks, and ideas in Tableau Online, our cloud collaboration and sharing platform.
If you’re a site administrator, choosing the best authentication method for your organization requires you balance competing priorities:
- Are your users happy entering their own login credentials, or are they expecting a more seamless experience?
- Do you have IT-based policies around password complexity and change frequency?
- How do you satisfy both end users and IT departments?
Never fear, SAML is here. Or more precisely, Active Directory Federation Services (ADFS) leveraging SAML is here. ADFS allows cloud-based services to employ Active Directory (AD) single sign-on (SSO), which is a common service used for authentication behind company firewalls. ADFS does this by integrating with SAML, which is an authentication standard currently available in Tableau Online. A word to the wise: We’re about to dive deep into the bowels of your Tableau Online account. Now’s the time to pull out your site administrator credentials and fire up your Active Directory admin account. Here’s what our authentication flow will look like. (Note that, in this example, the Identity Provider (IdP) is ADFS. However, Tableau Online also integrates with other SAML IdP providers like OneLogin and Okta. These services also have methods for federating user authentication to AD.) 
- Navigate to the Tableau Online sign-in page or a published workbook, and enter your user name.
- Tableau Online starts the authentication process and redirects the request to the registered IdP.
- The IdP requests your password and, after confirming that the user name you’ve submitted is identical to the user name stored in the IdP assertions, authenticates the user.
- The IdP returns a SAML success response to Tableau Online.
- Tableau Online displays the page you requested in step 1.
Authentication in this setup is performed by Active Directory, which is also used for many local authentication tasks. Once set up with Tableau Online, your end-users will use their regular AD credentials to log in to Tableau Online—the same credentials they use to log into their desktop computers. It’s a win-win situation. There’s no need for users to remember yet another password. And your IT team won’t need to manage an additional set of user credentials. Plus you can sleep soundly knowing your AD user credentials already comply with corporate policies. Isn’t it great making everyone happy?
Prerequisites
You’ll need an Active Directory Server with ADFS 2.0 installed (in this post I use Windows Server 2008 with ADFS 2.0). Your ADFS Server also needs to be exposed outside your company firewall. We recommend doing so in a secure manner (e.g. utilizing a reverse proxy). Exposing your ADFS Server allows Tableau Online to seamlessly redirect users to the login page hosted by ADFS—outlined in step #2 in the diagram above.
Export metadata from Tableau Online
First you’ll need to setup Tableau Online to use SAML. The configuration is done on the Authentication page, under the Settings tab:

- Log in to Tableau Online with your site-administrator credentials. (We recommended you maintain one site-administrator account using “Tableau ID” authentication. This way, if the SAML SSO malfunctions for any reason, you can still login to Tableau Online as a Site Administrator.)
- Navigate to Settings > Authentication
- Tick single sign-on with SAML.
- Follow step 1 “export metadata file from Tableau Online.” Click the “export metadata” button. This will download Tableau Online’s SAML Metadata XML file. This XML file contains information instructing ADFS which assertions to send to Tableau Online as well as the X.509 Certificate. As such, you can skip the “download signing and encryption certificate” option).
Configure ADFS to accept login requests from Tableau Online
Next you’ll set up ADFS to play nicely with Tableau Online.
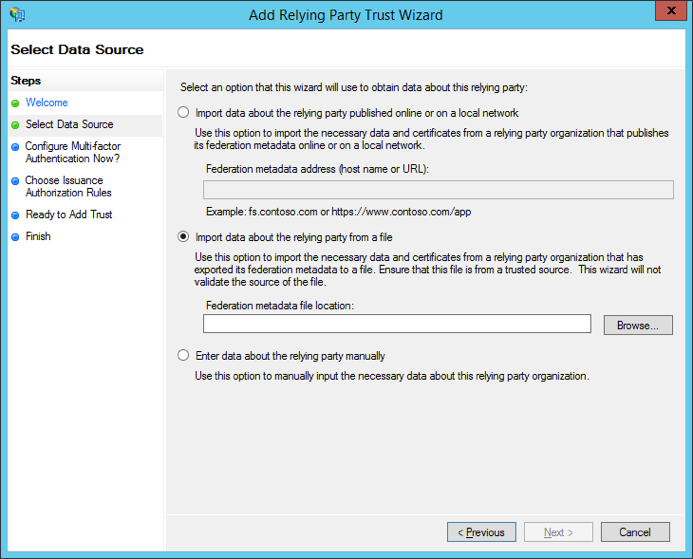
- Import the Tableau Online metadata file into ADFS. To do so, open the ADFS 2.0 Management Console and select “add relying party trust” and follow the wizard. In the “select data source” step, tick “import data about the relying party from a file” and browse…for the Tableau Online metadata file.
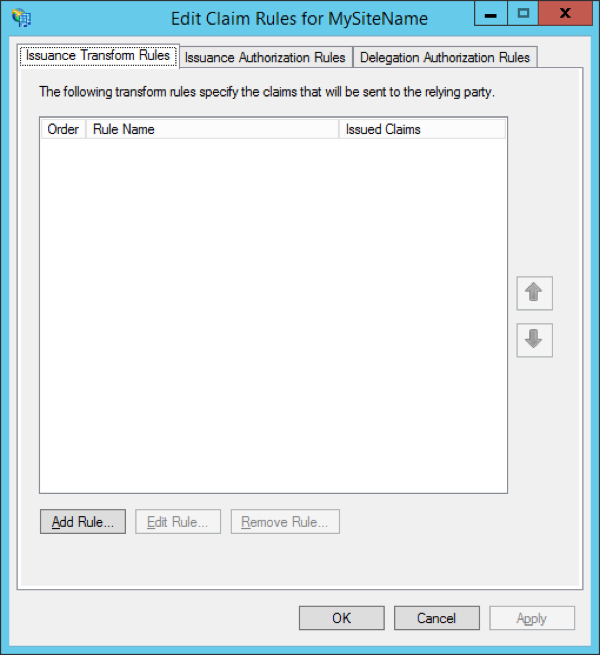
- On the final page of the wizard, select “open the edit claim rules dialog for this relying party trust when the wizard closes.” Tick this box and click “close.” The window below will open. Select “add rule...”
- Add a claim rule to ensure the assertions sent by ADFS match with the assertions Tableau Online expects. At a minimum, Tableau Online needs an email address. However, including first and last names in addition to email will ensure the user names displayed in Tableau Online are the same as those in your AD account. To do so:
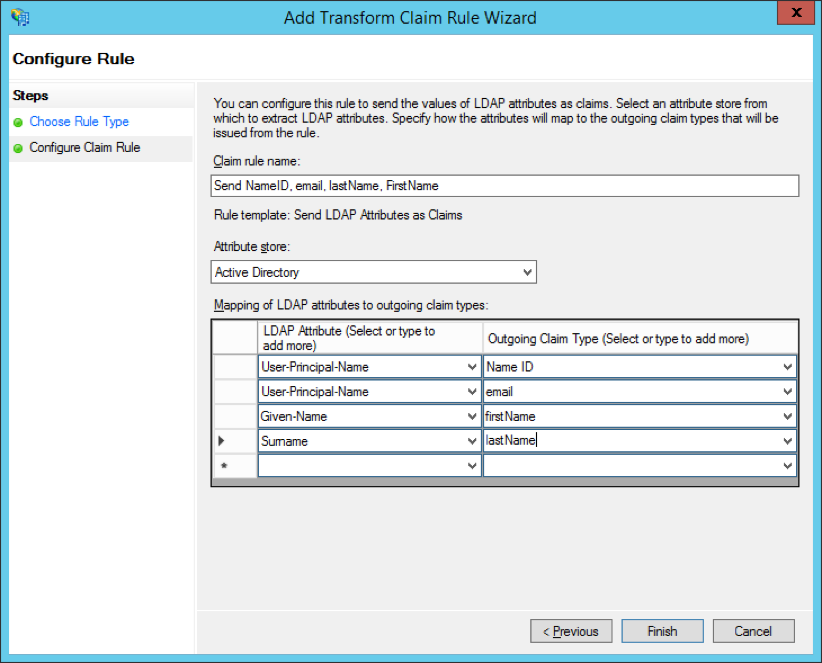
- On the first page of the wizard, select “Send LDAP attributes as claims” for the claim rule template.
- On the next page “configure claim rule,” name the claim rule anything that makes sense to you. Then enter “Active Directory” as the attribute store, and complete the mapping as shown below. The mapping requires exact spelling and is case sensitive, so double-check you have the information correct.
- Once finished adding the claim rule, you’ll export ADFS Federation metadata. This file will be imported into Tableau Online in a later step. It will be available at https://"adfs server name"/FederationMetadata/2007-06/FederationMetadata.xml
- When downloaded, ensure the file is correctly encoded as UTF-8 without BOM. Text editors like Sublime Text or Notepad++ can open and save this file with the correct encoding, if necessary. It seems minor, but this is an important to confirm. If the file isn’t saved with correct encoding, the metadata import into Tableau Online will fail.
- Now ensure that ADFS is using forms-based authentication. Logins will be performed via a browser window, so you need ADFS to default to this type of authentication. To do so:
- Edit web.config under c:\inetpub\adfs\ls\, searching for the tag
, and moving the line so it appears first in the list. Save the file. Doing so will cause IIS to automatically reload it.
- Edit web.config under c:\inetpub\adfs\ls\, searching for the tag
- Next, configure an additional ADFS relying party identifier. This allows your system to work around any ADFS bug with SAML logout. To do this:
- Go back to the ADFS management tool and right-click on the relying party you’ve just created for Tableau Online.
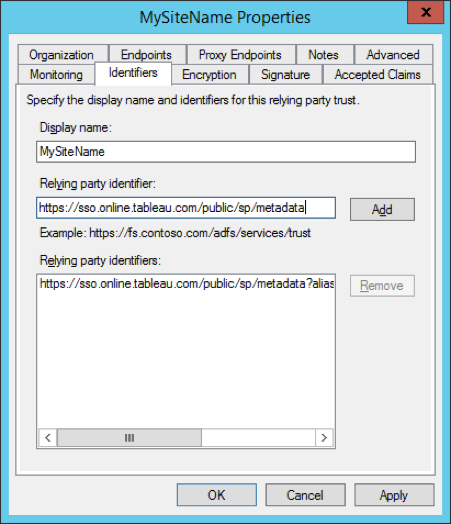
- Select “properties” and navigate to the “odentifiers” tab. Add the relying party identifier https://sso.online.tableau.com/public/sp/metadata to the existing entry.
- Finally, turn off ADFS assertion encryption for the relying party (Tableau Online does not currently support assertion encryption):
- Use PowerShell on the ADFS server to run the following command (substitute the “display name” in the screenshot above for “mysitename”): Set-ADFSRelyingPartyTrust -TargetName “MySiteName” -EncryptClaims 0
- If you receive the error, “Set-ADFSRelyingPartyTrust Cmdlet cannot be found,” you will need to add the ADFS PowerShell snap-in. To do so, use the following command: Add-PSSnapin Microsoft.Adfs.PowerShell.
Then repeat step #7.
Whew! Take a break and get yourself a cup of tea (I live in England, after all). You’ve made it this far. You deserve it. And you’re almost finished!
Import the ADFS metadata into Tableau Online
There’s just one last bit of configuration to do within Tableau Online.
- Return to Tableau Online’s Settings page and navigate to the Authentication tab. Go to #4—Import metadata file into Tableau Online. Import the file you previously exported from ADFS (FederationMetadata.xml). You will know it’s successfully imported when the remaining steps on the page cease to be greyed out.
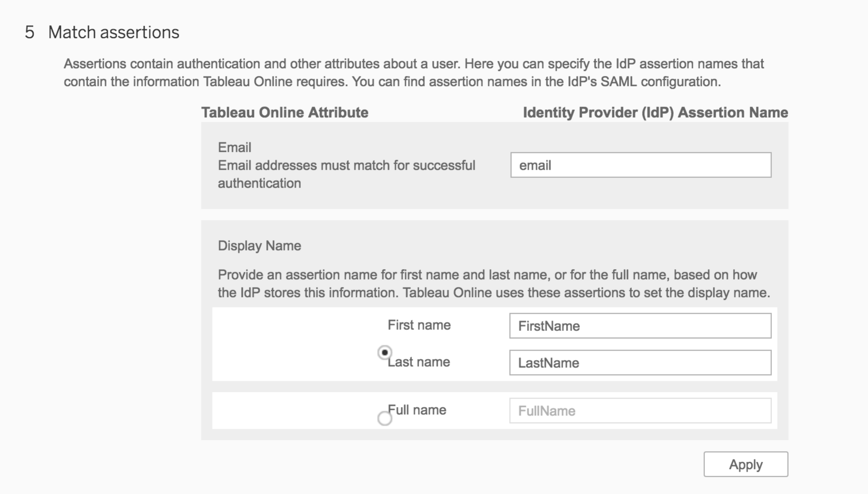
- Skip #5—match assertions. You’ve already created a claim rule in ADFS to match the assertion names to what Tableau Online expects.
- Note that Tableau Online matches assertion names against its internal user attributes—email and display name (see the screenshot below). It will match the “email” assertion against its “email” attribute, and “first name” plus “last name” against the “display name” attribute. In fact, the “display name” attribute is used to override the “display name” set when manually adding a user to Tableau Online.
- If you don’t yet have users in Tableau Online (other than your admin account of course), click “add users” in step #6—manage users. You can then add users manually via the form, or with a CSV import file.
- If you already have users added to your site, select “view users” and tick the checkbox next to the user’s name and select “authentication” from the “actions” dropdown menu. Change the authentication method to SAML SSO. Note this needs to be done on a per-user basis.
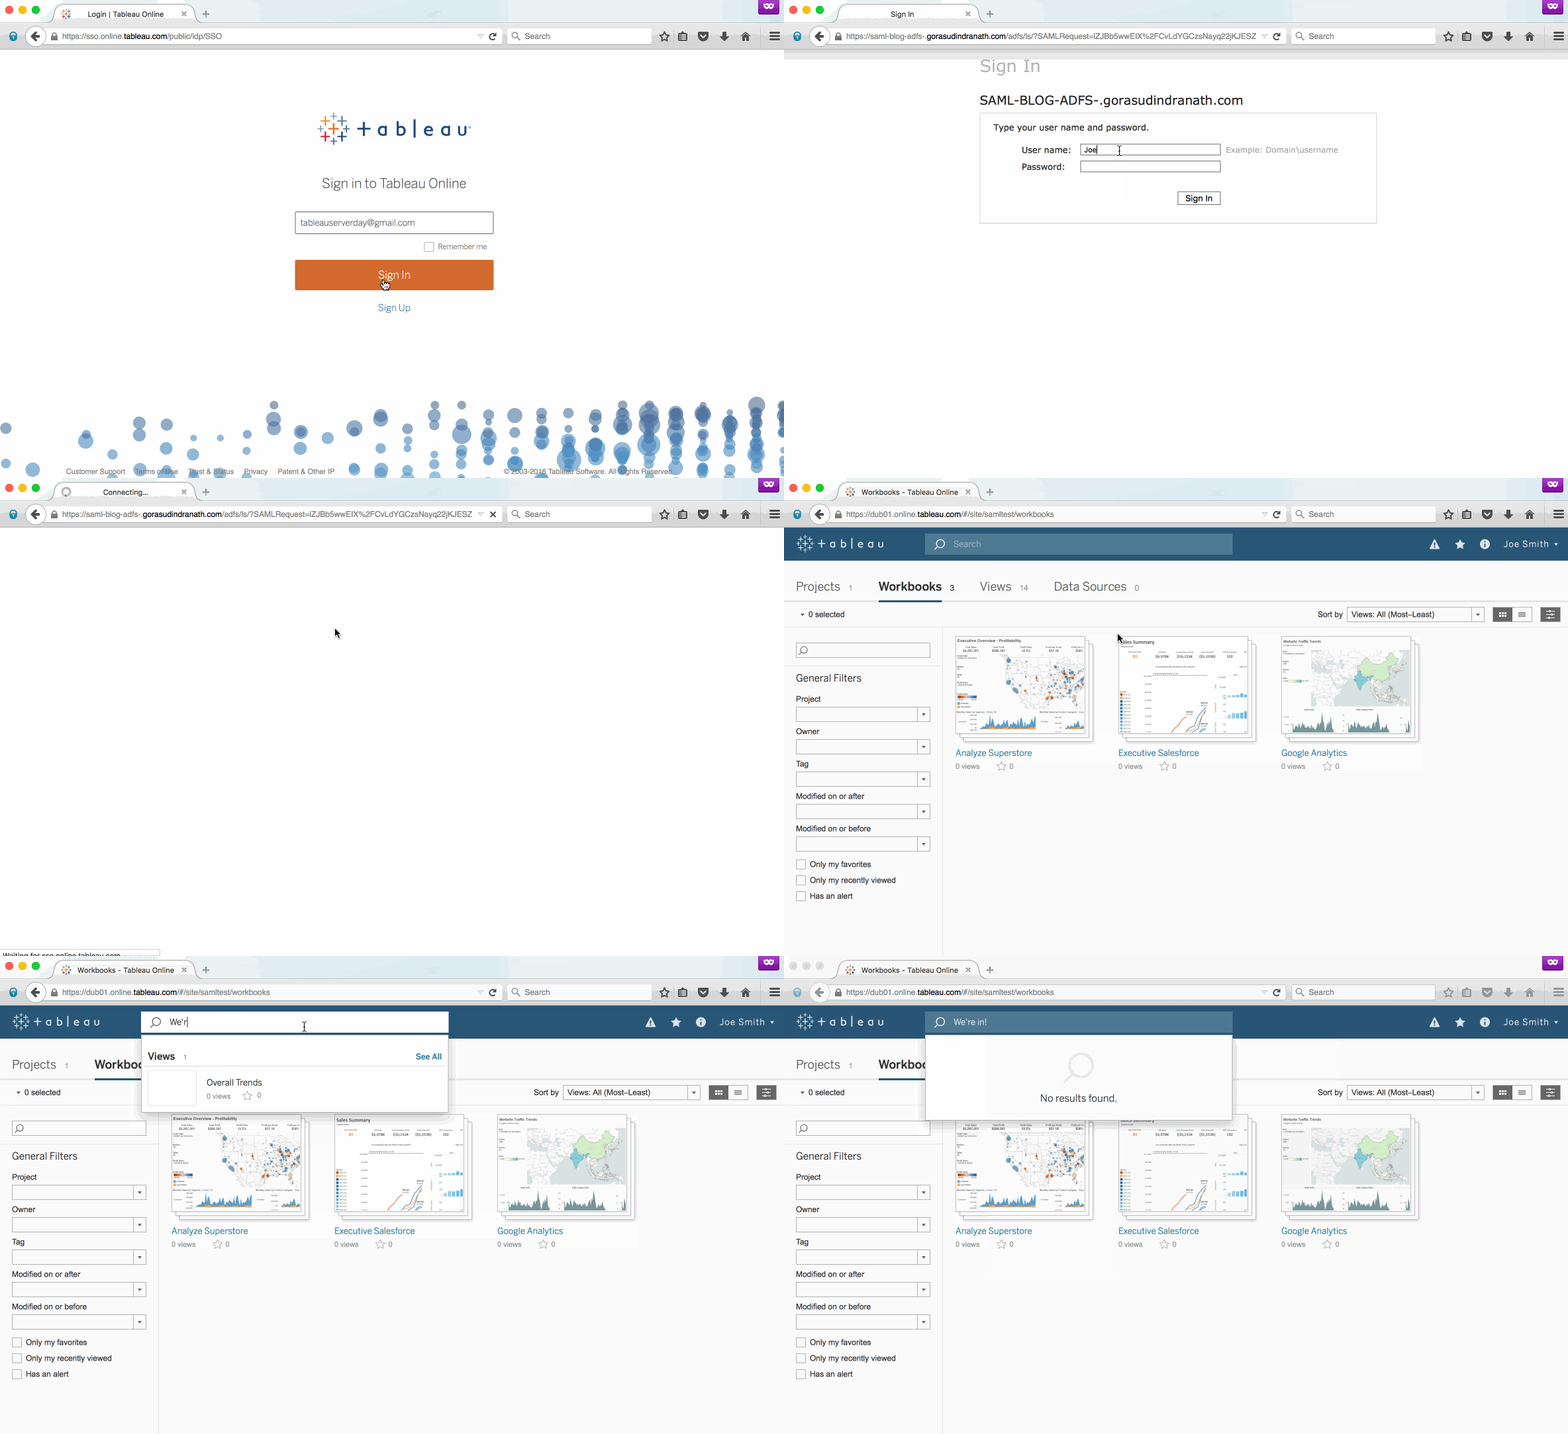
- Test SAML login by opening an Incognito Window in Chrome and navigating to https://online.tableau.com. Enter the email address of the user. Tableau Online will remove the password field if the user’s account is correctly set up for SAML SSO authentication.
- Click “sign in." You will be redirected to your ADFS login page. Enter your AD credentials. Finally, upon successful authentication ADFS will redirect you to Tableau Online.
Pat yourself on the back. You’ve made it to the finish line! Your site is now ready to authenticate via ADFS leveraging SAML. Your users will still navigate to https://online.tableau.com to sign in. But now, after entering their email address, the page will automatically redirect through ADFS and ask users for their AD username and password. Here's what it will look like:
Some other considerations
- After setting up SAML integration between ADFS and Tableau Online, you will need to add and delete users in Tableau Online based on changes in AD.
- Fully automated: Create a script (using PowerShell, Python, or batch file) to sync users between AD and Tableau Online. The script can utilize either tabcmd or our REST API to interact with Tableau Online.
- Manual: To add users, upload a CSV file or enter email addresses (semicolon-delimited) in the Tableau Online UI. To remove users, set their site role to “unlicensed” rather than deleting the user. Doing so prevents content owned by the deleted user from disappearing).
- A user’s email address is the user's unique identifier in Tableau Online. When using either automated or manual methods to sync users between Tableau Online and ADFS, your users’ email addresses must match the email address stored in AD.
- In this post we added a claim rule in ADFS to match the assertions between ADFS and Tableau Online (Step #3 in Configure ADFS to Accept Login Requests from Tableau Online). Alternatively, you could match these assertions in Tableau Online instead using #5—Match attributes under Settings -> Authentication in your Tableau Online site.
- If you run into errors while testing SAML login, a great tool for debugging these errors are the SAML log files generated by Tableau Online. You can download these from #7—Troubleshooting signle sign-on (SSO) under Settings -> Authentication in your Tableau Online site.
相關文章
Subscribe to our blog
在收件匣中收到最新的 Tableau 消息。


