Supercharge Analytics with the Power of AWS-Hosted TabPy


Authors: Vikrant Gawde, Sr. Solutions Engineer, Tableau; Swetha Bezawada, Product Manager, Tableau; Adiascar Cisneros, Senior Product Manager, Tableau; Ravi Bhattiprolu, Sr. Partner Solutions Architect, Amazon Web Services (AWS); Ariana Rahgozar, Sr. Solutions Architect, Amazon Web Services (AWS); and Erick Joaquin, Sr. Customer Solutions Manager, Amazon Web Services (AWS)
TabPy (Tableau Python Server) is an Analytics Extension implementation that expands Tableau’s capabilities by allowing users to execute Python scripts and functions via Tableau’s table calculations. TabPy enables advanced-analytics applications that extend the power of Tableau to get insights beyond what is possible with your data alone.
In this post, we explore a simple, scalable, and secure architecture to host TabPy on Amazon Web Services (AWS). We connect Tableau Desktop to TabPy hosted on an Amazon EC2 instance and create a calculated field using a custom Python script to perform a clustering algorithm. It helps to have prior working knowledge of configuring and using AWS Services as well as configuring TabPy Server.
Deployment of this solution into production involves additional considerations beyond the TabPy configuration described in this post, including security, reliability, and performance.
Solution overview
To get started with deploying TabPy on Amazon EC2, let’s discuss basic configuration to access this service from Tableau Desktop. Refer to Figure 1 below for a high level architecture of hosting TabPy Server on an Amazon EC2 Instance.

Figure 1. TabPy hosting architecture on AWS.
Prerequisites
- An AWS account with a role that has sufficient access to provision the required resources, including permission to create a new Amazon Virtual Private Cloud (VPC) as needed.
- Tableau Desktop / Tableau Cloud to test the connectivity and run advanced analytics with TabPy.
Design considerations and resources
- TabPy is hosted on Amazon EC2 instance. As a security best practice Amazon EC2 instance must be configured in a Private Subnet of a VPC and the access restricted only to the Application Load Balancer (ALB) through the aid of Security Groups. Alternatively, TabPy can be hosted as a containerized service with AWS Fargate for Amazon ECS.
- An ALB is essential to ensure that TabPy API is secured and accessible only via the Amazon API Gateway. It is possible to scale TabPy instances and create routing rules to distribute the traffic.
- VPC Link is an API Gateway resource that allows for connecting API routes to private resources inside a VPC. This blog provides an in-depth explanation of VPC private integrations and design patterns.
- API Gateway wraps the TabPy endpoints as secure (HTTPS) APIs without the overhead of managing SSL Certificates and custom domains. API Gateway is an optional component but is recommended to handle a variety of operational concerns such as traffic management, CORS support, authorization, throttling, monitoring, and API version management.
- TabPy supports basic authentication. User credentials are maintained in a file stored on the EC2 instance. Users of TabPy service are assumed to have good knowledge of configuring and/or using the TabPy server. Refer to Tableau’s TabPy Project portal for guidance.
Refer to Figure 2 below for a visual overview of the required steps to deploy and connect to TabPy Server on Amazon EC2.
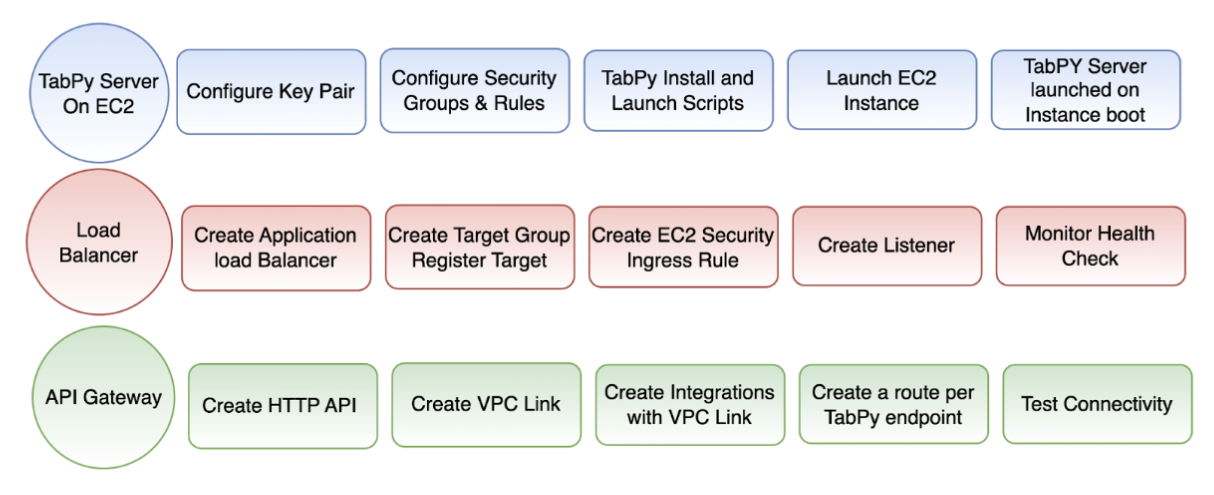
Figure 2. Visual overview of the sequence of steps to host TabPy Server.
For setting up TabPy Server on AWS, you can either use AWS CloudShell from the AWS Console (as shown in Figure 3 below), or directly from a terminal with the AWS CLI installed. Note, in this blog we will demonstrate the setup and configuration using AWS CloudShell.

Figure 3. Accessing AWS CloudShell from the AWS Console.
Step 1: Setup the TabPy Server on EC2
Step 1.1: Creating a VPC and subnets for TabPy Server
Within the AWS Console, navigate to the VPC console by searching VPC in the search bar. Once there, click “Create VPC” to create a VPC with two public and two private subnets across two Availability zones. For this example, one NAT Gateway will suffice. See Figure 4 below for reference on configuration settings for the VPC.
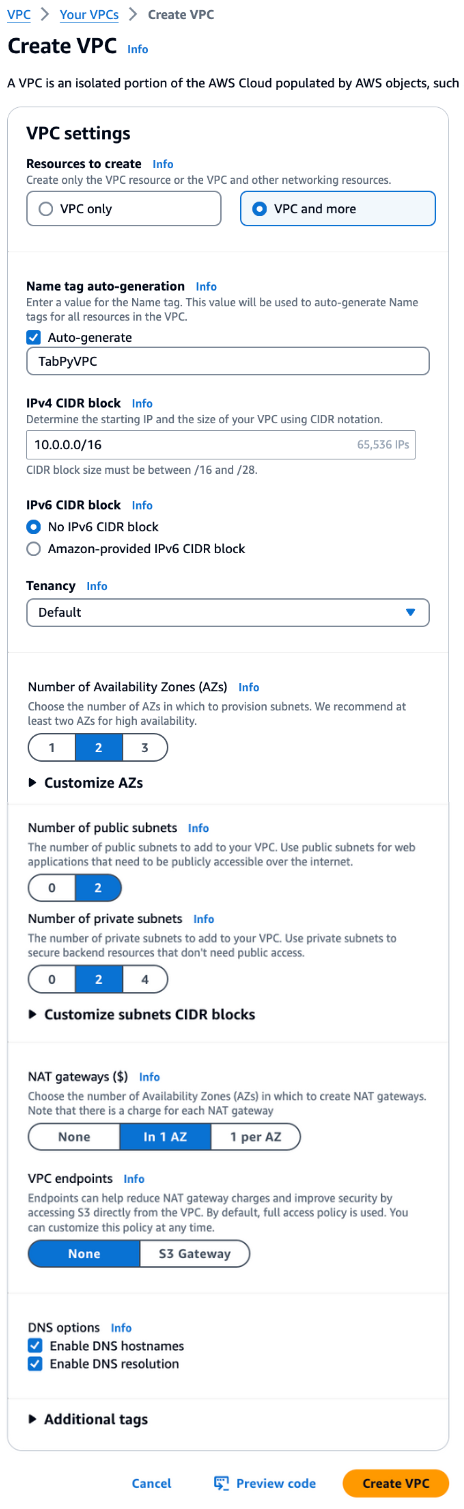
Figure 4. Creating TabPy VPC and subnets.
Step 1.2: Update the AWS CloudShell environment
Once your VPC is created, you can copy your VPC_ID and Private Subnet_IDs directly from the AWS management console. Note, you will need to confirm which subnets are public and private by selecting them from this page. See Figure 5 below for reference.
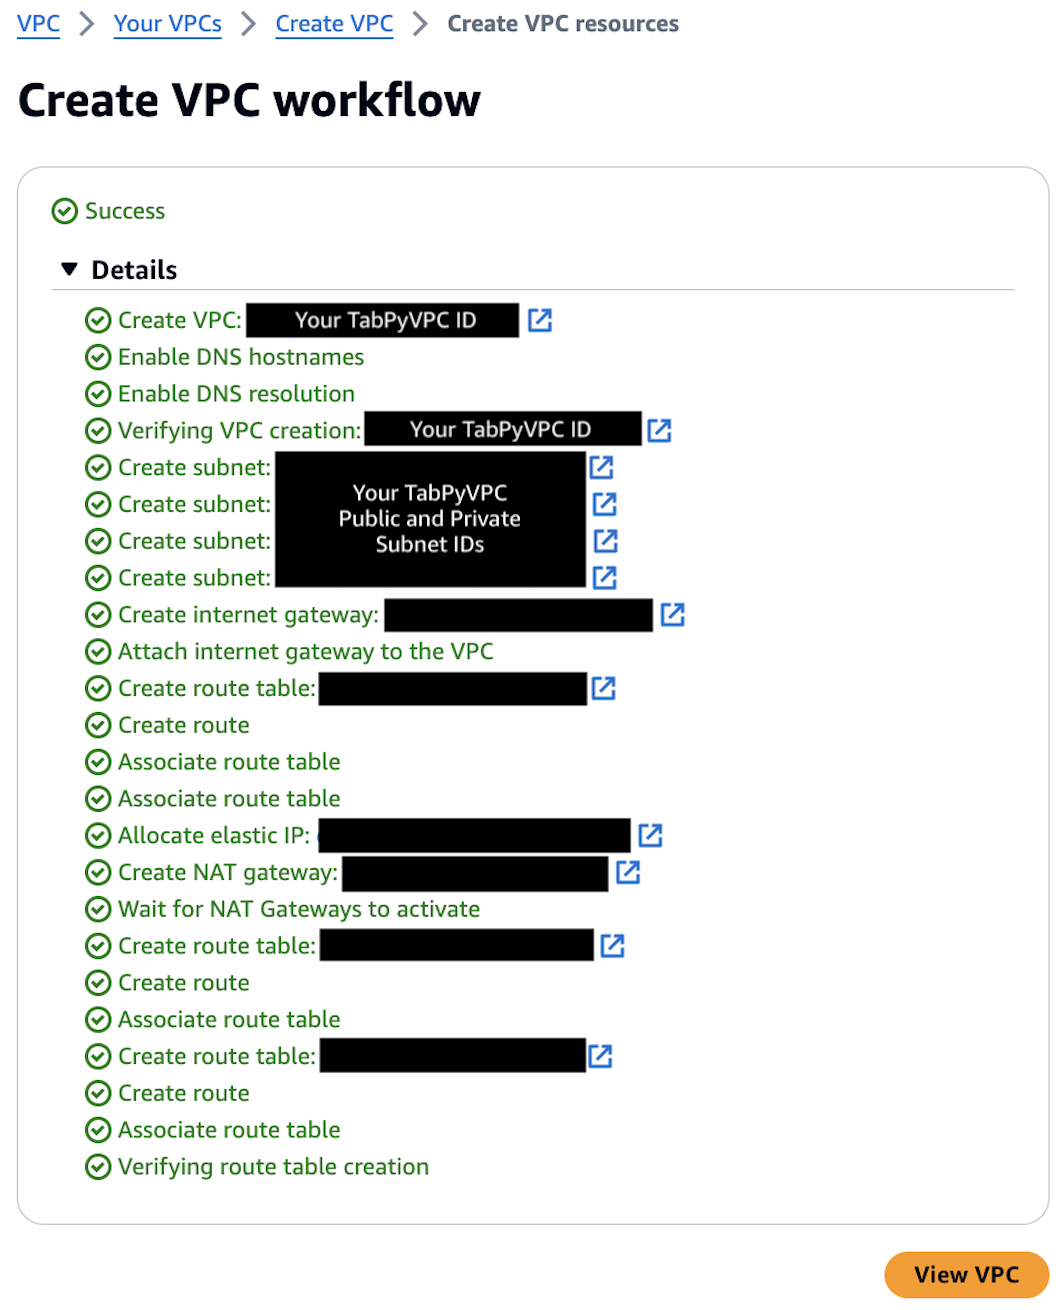
Figure 5. VPC_ID and Subnet_IDs for use with TabPy configuration.
With your VPC_ID and Private Subnet_IDs saved, input them into the following command to store as environmental variables. Please ensure there are no extra spaces between the equal sign and VPC_ID and Subnet_IDs, as that may result in errors. Run the following command using AWS CloudShell:
    export TABPY_VPC_ID=<Replace with your VPC_ID> \

    export TABPY_SUBNET_ID=<Replace with one of your Private Subnet_IDs> \

    export ALB_PRIVATE_SUBNETS='<Replace with both Private Subnet_IDs, separated by a space>'
For reference, see sample screenshot in Figure 6.

Figure 6. Sample command screenshot with VPC_ID and subnet_IDs inputs.
Step 1.3: Set up remaining environment variables in AWS CloudShell
Run the following command to set up the remaining environmental variables:
    export EC2_SSH_KEY_PAIR=MyTabPyServerKeyPair \

    EC2_SECURITY_GROUP=tabpy-security-group \

    EC2_INSTANCE_TYPE=t2.micro \

    TABPY_HTTP_PORT=9004

    EC2_SUBNET_CIDR=$(aws ec2 describe-subnets --subnet-ids $TABPY_SUBNET_ID | jq -r '.Subnets[0].CidrBlock'); \

    VPC_CIDR=$(aws ec2 describe-vpcs --vpc-ids $TABPY_VPC_ID | jq -r .Vpcs[0].CidrBlock)

    AMI_ID=$(aws ssm get-parameters \

      --names /aws/service/ami-amazon-linux-latest/amzn2-ami-hvm-x86_64-gp2 \

      --region $AWS_REGION \

     --query Parameters[0] | jq -r .Value)
You can validate that all the required environments are properly set by running the command below:
    echo \

    && echo "Key Pair: $EC2_SSH_KEY_PAIR" \

    && echo "EC2 Instance type: $EC2_INSTANCE_TYPE" \

    && echo "TabPy port: $TABPY_HTTP_PORT" \

    && echo "Region: $AWS_REGION" \

    && echo "VPC ID: $TABPY_VPC_ID" \

    && echo "AMI ID: $AMI_ID" \

    && echo "Subnet ID: $TABPY_SUBNET_ID" \

    && echo "ALB Subnet IDs: $ALB_PRIVATE_SUBNETS"
Step 1.4: Create an Amazon EC2 key pair
    aws ec2 create-key-pair \

    --key-name $EC2_SSH_KEY_PAIR \

    --key-type rsa \--key-format pem \

    --query "KeyMaterial" \

    --output text > $EC2_SSH_KEY_PAIR.pem; \

    chmod 400 $EC2_SSH_KEY_PAIR.pem; \

    ls
Step 1.5: Create the Amazon EC2 security group
    aws ec2 create-security-group  \

    --group-name $EC2_SECURITY_GROUP   \

    --description "TabPy Server security group" \

    --vpc-id $TABPY_VPC_ID > security_group.json

    export SECURITY_GROUP_ID=$(jq -r '.GroupId' security_group.json)
Step 1.6: Create the TabPy Server installation script
Create the TabPy Server installation script, which will be installed on Amazon EC2 instance in the next step. For the following script, update the username and password you will use to log into the TabPy Server, which are currently set to mktng and mktng@2024, respectively.
    cat  > tabpysetup.sh << 'TABPY_SCRIPT'

    #!/bin/bash

    sudo -u ec2-user -i <<'EOF'

    python3 -m ensurepip --upgrade

    python3 -m pip install --upgrade pip

    pip3 install tabpy --quiet

    pip install urllib3==1.26.6

    export TABPY_HOME=/home/ec2-user/tabpy

    mkdir $TABPY_HOME

    cat > $TABPY_HOME/tabpy.config << 'EOF1'

    [TabPy]

    # TABPY_QUERY_OBJECT_PATH = /tmp/query_objects

    TABPY_PORT = 9004

    TABPY_PWD_FILE = /home/ec2-user/tabpy/password.txt

    EOF1

    tabpy-user add -umktng -p mktng@2024 -f $TABPY_HOME/password.txt

    nohup tabpy --config=$TABPY_HOME/tabpy.config > $TABPY_HOME/tabpy.log 2>&1 &

    EOF

    TABPY_SCRIPT
Step 1.7: Launch a t2.micro EC2 instance for hosting TabPy Server
This script launches an Amazon EC2 instance and uses the TabPy script to install the TabPy Server (which will take about five minutes to complete).
    aws ec2 run-instances \

    --image-id $AMI_ID \

    --instance-type $EC2_INSTANCE_TYPE \

    --key-name $EC2_SSH_KEY_PAIR \

    --subnet-id $TABPY_SUBNET_ID \

    --security-group-ids $SECURITY_GROUP_ID \

    --region $AWS_REGION \

    --user-data file://tabpysetup.sh \

    --tag-specifications "ResourceType=instance,Tags=[{Key=Name,Value=TabPyAnalyticsServer}]" > tabpy_ec2-instance-meta-data.json
Confirm both system and instance status say “passed” indicating the EC2 instance is ready. You can use the following command to check the EC2 status:
export EC2_INSTANCE_ID=`jq -r '.Instances[0].InstanceId' tabpy_ec2-instance-meta-data.json` && watch -n 1 "aws ec2 describe-instance-status --instance-ids $EC2_INSTANCE_ID"
Step 1.8: Check the EC2 console log to verify that TabPy is set up
To confirm TabPy was successfully configured, run the following command which returns the username and password you set earlier. Note, this command will take a few minutes, but ensure it is successful before proceeding:
watch -n 1 -t -d "aws ec2 get-console-output --instance-id $EC2_INSTANCE_ID | jq -r .Output | grep -i 'Added username'"
Step 2: Configure the Application Load Balancer (ALB)
Step 2.1: Create the ALB
    aws elbv2 create-load-balancer \

    --name tabpy-server-alb \

    --type application \

    --subnets $ALB_PRIVATE_SUBNETS \

    --security-groups $SECURITY_GROUP_ID \

    --scheme internal  > tabpy_alb-meta-data.json

    export ALB_ARN=`jq -r '.LoadBalancers[0].LoadBalancerArn' tabpy_alb-meta-data.json`
Wait for the ALB to be provisioned. You can confirm it has been provisioned by executing the following command, which waits for the ALB to be available:
aws elbv2 wait load-balancer-available --load-balancer-arns $ALB_ARN
Step 2.2: Allow ALB traffic into the Amazon EC2 security group
    aws ec2 authorize-security-group-ingress \

    --group-id $SECURITY_GROUP_ID \

    --protocol tcp \

    --port $TABPY_HTTP_PORT \

    --cidr $EC2_SUBNET_CIDR > security-group-ingress.json
Step 2.3: Create ALB target group
    aws elbv2 create-target-group --name alb-tabpy-server-target \

    --protocol HTTP \

    --port $TABPY_HTTP_PORT \

    --vpc-id $TABPY_VPC_ID > tabpy_alb-target-meta-data.json; \

    export TARGET_GROUP_ARN=$(jq -r '.TargetGroups[0].TargetGroupArn' tabpy_alb-target-meta-data.json)
Step 2.4: Register ALB targets
    aws elbv2 register-targets --target-group-arn $TARGET_GROUP_ARN \

    --targets Id=$EC2_INSTANCE_ID; \

    aws elbv2 create-listener --load-balancer-arn $ALB_ARN \

    --protocol HTTP --port 80 \

    --default-actions Type=forward,TargetGroupArn=$TARGET_GROUP_ARN > tabpy_alb-listener.json; \


    aws ec2 authorize-security-group-ingress \

    --group-id $SECURITY_GROUP_ID \

    --protocol tcp \

    --port 80 \

    --cidr $VPC_CIDR
Please note this will take a few minutes. Before proceeding, confirm the ALB state is changes from “initializing” to “healthy” by running the following command:
watch -n 1 -t -d "aws elbv2 describe-target-health --target-group-arn $TARGET_GROUP_ARN | jq -r .TargetHealthDescriptions[0].TargetHealth.State"
Step 3: Configure the API Gateway
Step 3.1: Create the API Gateway for the TabPy Server
    aws apigatewayv2 create-api \

    --name tabpy-server-http-api \

    --no-disable-execute-api-endpoint \

    --protocol-type HTTP > tabpy-http-api.json; \

    export API_ID=`jq -r '.ApiId' tabpy-http-api.json`
Step 3.2: Create an API stage
    aws apigatewayv2 create-stage \

    --api-id $API_ID \

    --stage-name '$default' \

    --auto-deploy
Step 3.3: Create the VPC link
    aws apigatewayv2 create-vpc-link \

    --name tabpy-vpc-link \

    --subnet-ids $ALB_PRIVATE_SUBNETS \

    --security-group-ids $SECURITY_GROUP_ID > vpc-link.json; \

    export VPC_LINK_ID=`jq -r '.VpcLinkId' vpc-link.json`; \

    export LISTENER_ARN=`aws elbv2 describe-listeners --load-balancer-arn $ALB_ARN | jq -r '.Listeners[0].ListenerArn'`
Note that it will take a few minutes for the VPC Link to be created. Before proceeding, run the following command to ensure the VPC Link state has changed from “Pending” to “Available”:
watch -n 1 -d -t "aws apigatewayv2 get-vpc-link --vpc-link-id $VPC_LINK_ID | jq -r .VpcLinkStatus"
Step 3.4: Create the API Gateway integration
    aws apigatewayv2 create-integration \

    --api-id $API_ID \

    --integration-type HTTP_PROXY \

    --integration-method ANY --connection-type VPC_LINK \

    --connection-id $VPC_LINK_ID \

    --integration-uri $LISTENER_ARN \

    --payload-format-version 1.0 > vpc-integration.json;

    export VPC_LINK_INTEGRATION=$(jq -r .IntegrationId vpc-integration.json)
Step 3.5: Create API Gateway routes to TabPy Server
    aws apigatewayv2 create-route \

    --api-id $API_ID \

    --route-key 'POST /evaluate' \

    --target integrations/$VPC_LINK_INTEGRATION;

    aws apigatewayv2 create-route \

    --api-id $API_ID \

    --route-key 'GET /info' \

    --target integrations/$VPC_LINK_INTEGRATION;

    aws apigatewayv2 create-route \

    --api-id $API_ID \

    --route-key 'POST /query' \

    --target integrations/$VPC_LINK_INTEGRATION;

    aws apigatewayv2 create-route \

    --api-id $API_ID \

    --route-key 'GET /endpoints' \

    --target integrations/$VPC_LINK_INTEGRATION
Step 4: Connect TabPy Server to Tableau Desktop and test
Step 4.1: Add TabPy Server as an Analytics Extension to Tableau Desktop
1. Launch Tableau Desktop and navigate to “Manage Analytics Extension Connection”, shown in Figure 7.
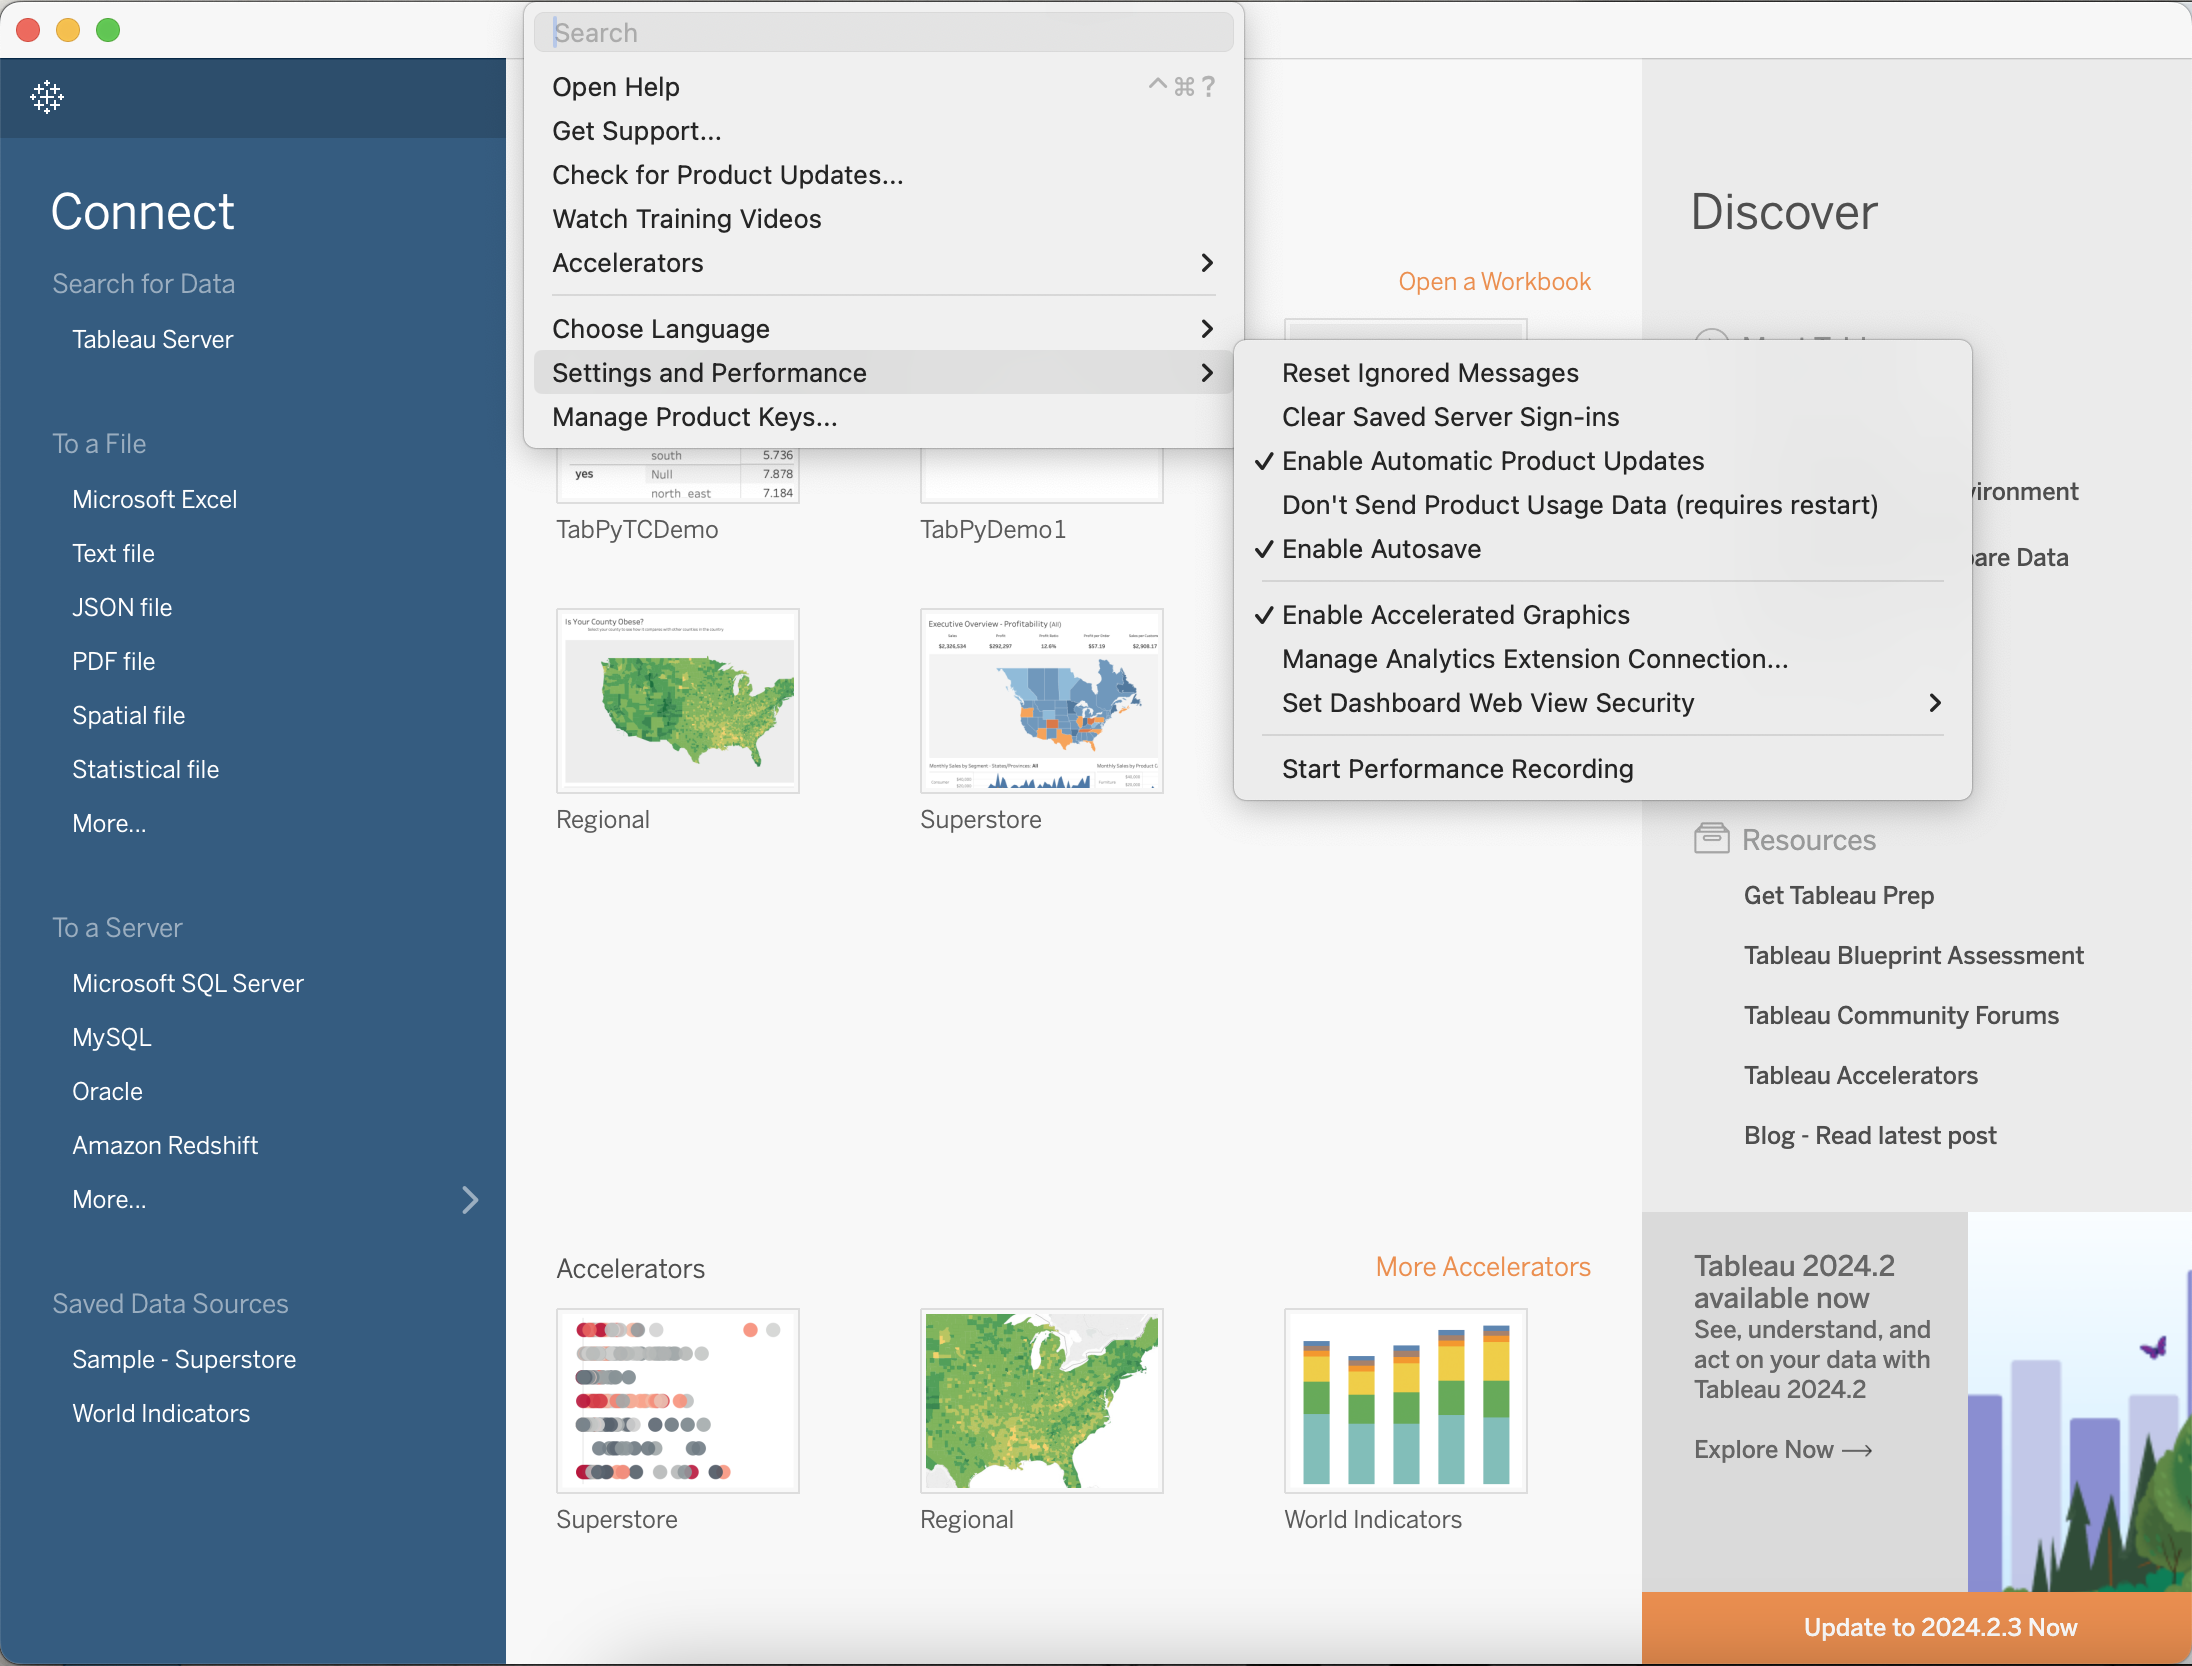
Figure 7. Screenshot for Configuring Analytics Extension Connection.
2. Once selected, you will be prompted to provide the API URL, Port, Username, and Password. Click the “Require SSL” option since the API is secured over HTTPS. The hostname can be retrieved via AWS CloudShell by running the following command. Note you do not need the HTTPS portion of the URL for TabPy configuration.
echo https://$API_ID.execute-api.$AWS_REGION.amazonaws.com/$API_STAGE
The username and password should match what was entered in Step 1.6 "Create the TabPy Server Installation Script". See Figure 8 below for completed sample.
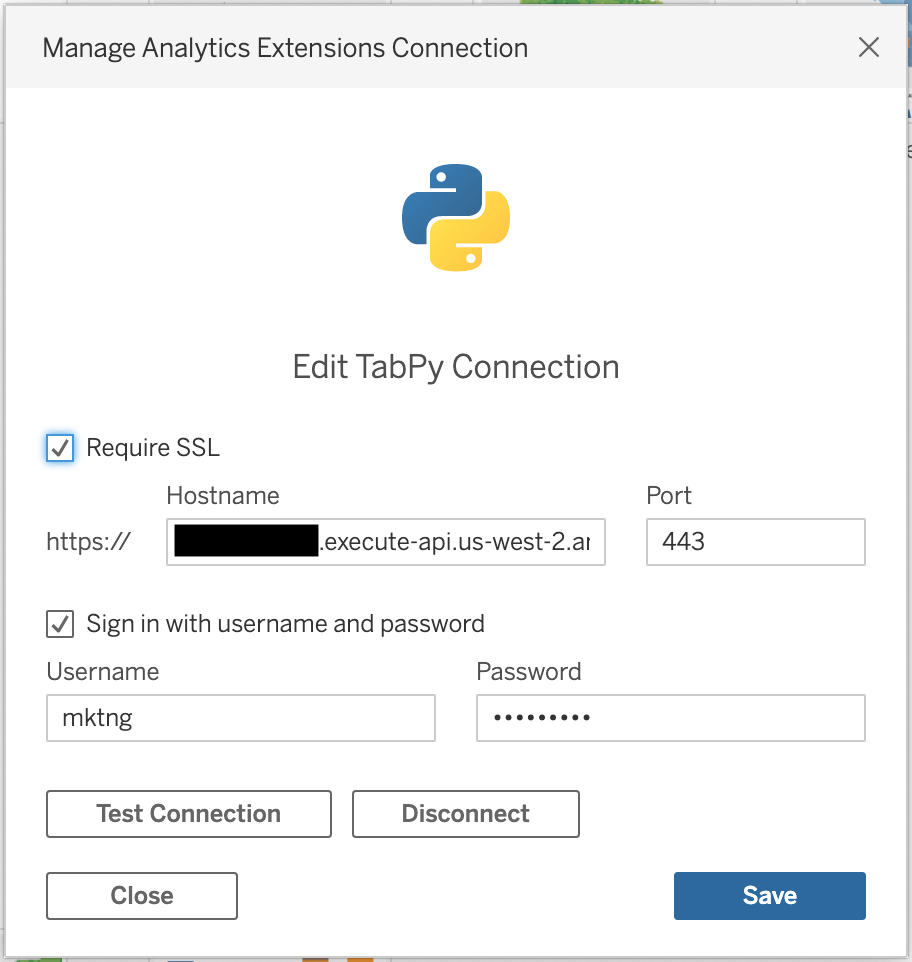
Figure 8. Configured Manage Analytics Extension Connection example.
3. Verify the TabPy connection is successful. If successful, you will see the message in Figure 9 below.

Figure 9. Success message after connecting to Analytics Extension.
Step 4.2: Run your first TabPy script
With TabPy successfully configured as an Analytics Extension to Tableau, you can now run a sample script. In this use case, we will perform basic K-Means Clustering using TabPy and Tableau Desktop.
1. To begin, import Sample Dataset into Tableau. In this example we are using a migration dataset. See Figure 10 below for the sample dataset in Tableau.
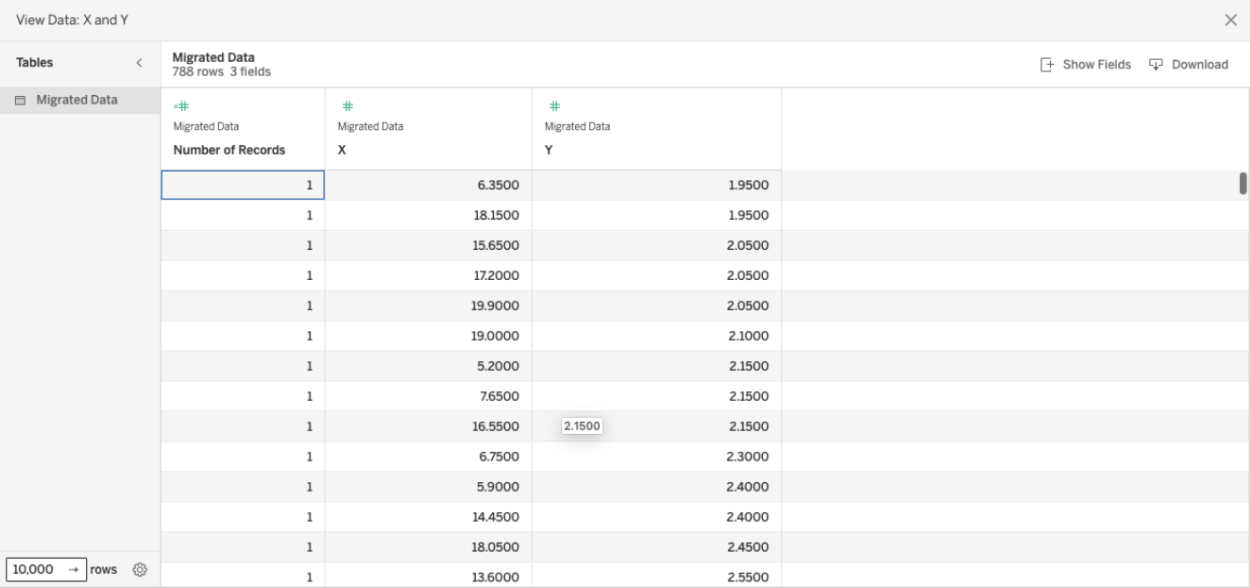
Figure 10. Sample data set imported into Tableau.
2. With the data set imported, open a new sheet in Tableau and create a calculated field. Within the calculated field, you can input Python code and import Python libraries such as numpy and sckit-learn. In this example, we will perform a clustering algorithm. See Figure 11 and Figure 12 below for the sample Python code and resulting visualization in Tableau.
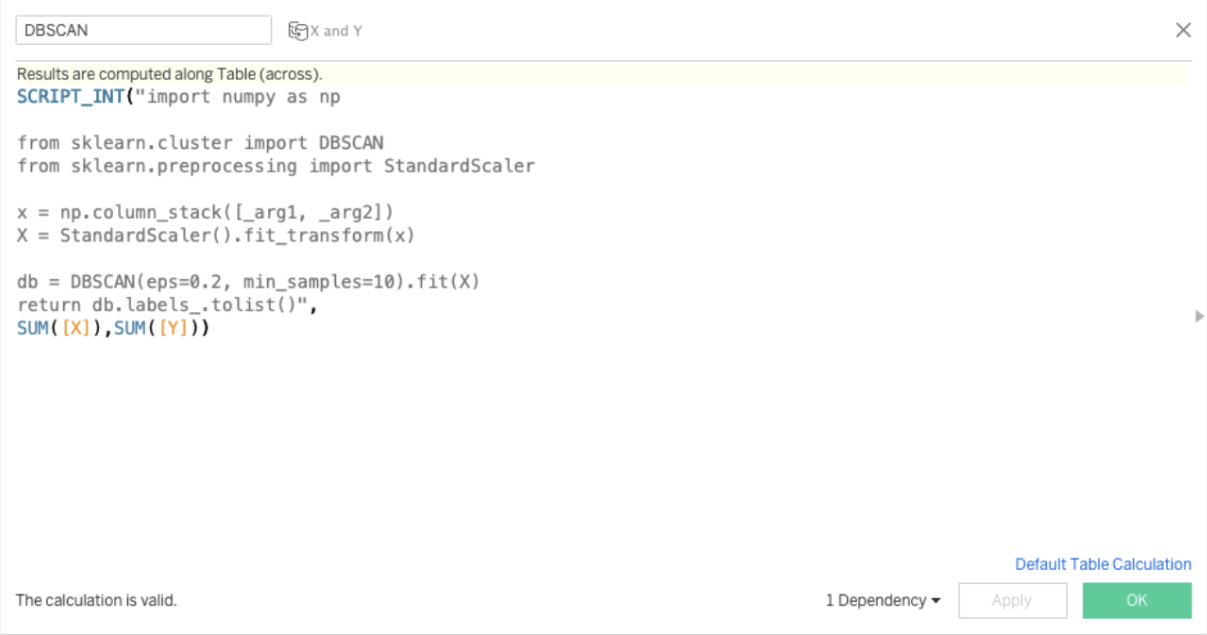
Figure 11. Sample Python script for clustering in TabPy.
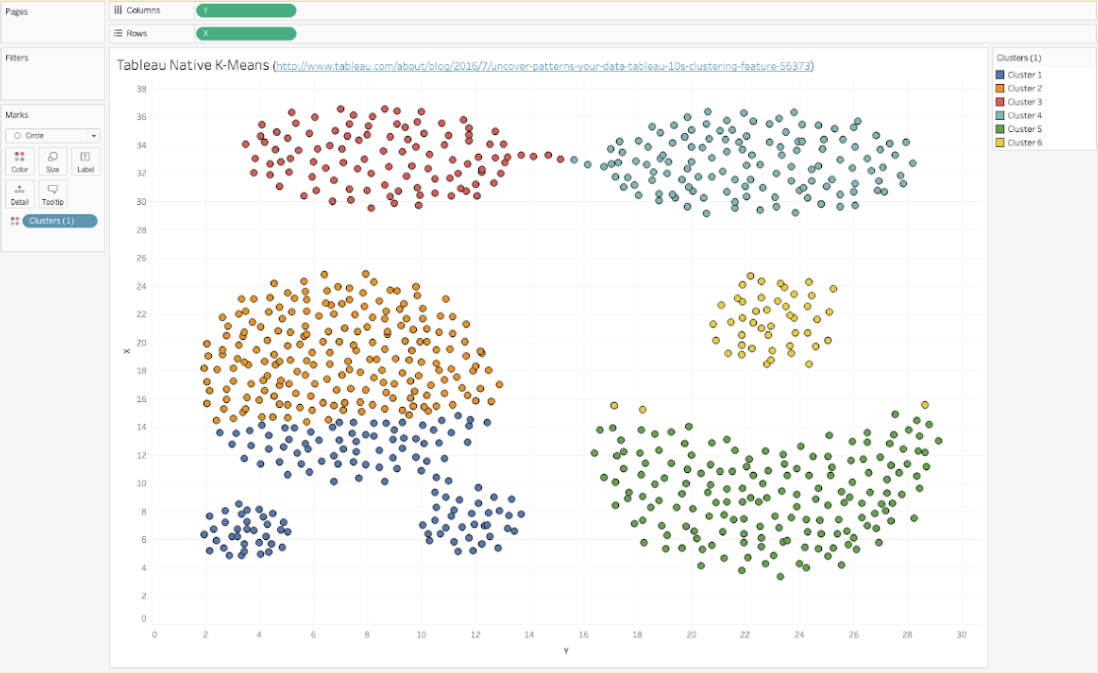
Figure 12. Clustering Visualization in Tableau Desktop.
Removing the installation
If you decide you do not need this TabPy implementation and need to remove any remaining resources to avoid unnecessary costs, delete the associated AWS infrastructure and remove the Analytics Extension created. Note that AWS CloudShell is ephemeral, hence it is required to reset the environment variables by re-running the following commands:
    export VPC_LINK_ID=$(jq -r '.VpcLinkId' vpc-link.json)

    export API_ID=$(jq -r '.ApiId' tabpy-http-api.json)

    export EC2_INSTANCE_ID=$(jq -r '.Instances[0].InstanceId' tabpy_ec2-instance-meta-data.json)

    export SECURITY_GROUP_ID=$(jq -r '.GroupId' security_group.json)

    export EC2_SSH_KEY_PAIR=MyTabPyServerKeyPair

    export TARGET_GROUP_ARN=$(jq -r '.TargetGroups[0].TargetGroupArn' tabpy_alb-target-meta-data.json)

    export ALB_ARN=$(jq -r '.LoadBalancers[0].LoadBalancerArn' tabpy_alb-meta-data.json)
To delete the API Gateway resources, run the following commands:
aws apigatewayv2 delete-vpc-link --vpc-link-id $VPC_LINK_ID
aws apigatewayv2 delete-api --api-id $API_ID
To delete the Amazon EC2 Instance and application load balancer configurations, run the following commands:
aws elbv2 delete-load-balancer --load-balancer-arn $ALB_ARN
aws elbv2 delete-target-group --target-group-arn $TARGET_GROUP_ARN
aws ec2 terminate-instances --instance-ids $EC2_INSTANCE_ID
Once your Amazon EC2 Instance has been terminated, you can delete the associated security groups and key pairs with the following commands:
aws ec2 delete-security-group --group-id $SECURITY_GROUP_ID
aws ec2 delete-key-pair --key-name $EC2_SSH_KEY_PAIR
Next steps
Now that we have enabled and demonstrated TabPy Analytics Extension hosted on AWS, it should be apparent how powerful this configuration is. There are many ways to augment analytics for production systems with this capability. However, the steps outlined above are closer to a proof of concept than a production grade implementation. The features needed for production workloads are determined by the specific requirements and restrictions of each environment. To learn more, reference the AWS Well-Architected Framework which describes key concepts, design principles, and architectural best practices for designing secure, reliable, and performant production workloads in the cloud.
相关故事

Tableau and dbt Labs: Strategic Partnership and Integration
 2024/10/08
Tableau + AWS: Accelerating your digital transformation with Modern Cloud Analytics
 2023/11/27
Tableau and AWS help customers digitally transform with Modern Cloud Analytics, combining technical resources and expertise with our vast partner networks.

Streaming Analytics with Tableau and Databricks
 2023/07/04
Subscribe to our blog
在您的收件箱中获取最新的 Tableau 更新。